In the process of troubleshooting intermittent Wi-Fi connections on an isolated network using an Apple Silicon M1-powered MacBook Pro, I came across wireless network configuration and settings recommendations Apple maintains to assist iPhone, iPad and Mac users in implementing and maintaining reliable, robust Wi-Fi networks.
Here are 10 tips collected from guidance Apple maintains recommending settings users apply to their Wi-Fi routers, base stations and access points.
Apple’s 10 tips to improve your Wi-Fi
1. Set security to WPA3 Personal
The Wi-Fi Alliance began certifying products for WPA3 use back in 2018, so it’s time to upgrade if you’re still running the older WPA2 standard, if you can. The most current wireless encryption protocol, WPA3 Personal offers a more secure connection but may prove incompatible with some older equipment that might only work with the older WPA2 protocol.
Check to confirm your smartphones, tablets and laptops are compatible with Wi-Fi 6, also known as 802.11ax, then enable the upgrade on your Wi-Fi router and access points to improve the security of your wireless network.
If you must continue using WPA2 for compatibility with older devices that you can’t currently replace or upgrade, check to see if your Wi-Fi router can run WPA2/WPA3 Transitional — sometimes called WPA3 Transitional or WPA3 Transition Mode — a mixed radio mode that assists connecting legacy equipment while at least permitting newer devices to benefit from the newer, more secure technology.
2. Avoid disabling security settings
Apple warns against accepting security settings — such as None, Open or Unsecured — that disable Wi-Fi security and encryption. Further, Apple confirms WPA/WPA2 mixed modes and WPA Personal, among other Wi-Fi security protocols, are no longer secure technologies and should be replaced with newer, more secure alternatives, as described above.
3. Assign the same SSID for each band
Different wireless technologies broadcast using different bands. For example, the 2.4GHz, 5GHz and 6GHz frequencies are the commonly used bands.
Apple recommends assigning the same network name, or SSID, for each band, as opposed to creating different network names for each band. The company warns failure to follow this convention could result in devices proving unable to reliably connect to all available bands, thereby potentially impeding and slowing wireless performance.
4. Do not enable hidden networks
Even when a Wi-Fi router or access point is set to hide its network name, the SSID remains easily discoverable and doesn’t effectively prevent detection or truly discourage unauthorized access. In fact, hidden networks are often more intriguing to hackers as they potentially indicate something of value exists on that network.
You might also receive privacy warnings as a result of connecting to a hidden network, so Apple recommends setting Hidden Network values to disabled and using WPA3 Personal, instead, to assist securing Wi-Fi connectivity.
SEE: Hiring Kit: Network Engineer (TechRepublic Premium)
5. Disable MAC filtering
Apple discourages permitting devices to connect only by accepting specific media access control addresses that are unique to each device.
There are several reasons, including the fact authorizing only known MAC addresses doesn’t prevent others from detecting, monitoring or attacking traffic on the network and the fact MAC addresses are easily impersonated by malicious users. The company again recommends using proper security settings — WPA3 Personal, if possible — instead.
6. Enable automatic updates
As an IT consultant, there were previously occasions in which I or my consulting firm wanted to control when various network components and computers downloaded and installed new security updates and performance patches. Those days are over.
Now, installing firmware and software updates as soon as they become available is the best advice, and that’s exactly what Apple recommends users do: Configure their Wi-Fi routers and access points to automatically process updates. The step is a best practice that ensures Wi-Fi equipment operates using the most current software and enables more reliable and secure wireless networking.
7. Set Channel to Auto
Don’t try to outsmart your Wi-Fi router. Neighbors — both residences and businesses — continually come and go and change their own equipment and configurations. Don’t try to stay a step ahead of surrounding networks by manually selecting the channels your Wi-Fi equipment uses to broadcast its communications.
Trust Wi-Fi routers and access points to do a better job and place the setting on Auto. Wi-Fi routers are increasingly using artificial intelligence to improve performance, and this is yet another example of how technological advances are better positioning equipment to intelligent adjustments rather than wait for you to catch an issue and update settings correspondingly.
8. Set DHCP to Enabled
Unless there’s a server on your local area network that’s managing network addressing responsibilities — the process by which devices send a request for and subsequently receive critical network address, Domain Name Service and default gateway information — let the Wi-Fi router perform that task.
Don’t try setting manual IP addresses or permitting multiple devices to serve as Dynamic Host Control Protocol network addressing authorities. Such efforts will not end well, as you’re likely to encounter conflicts and an inability to use your device properly when connecting to other networks. There should only be a single DHCP server on your network, and in most cases, the function should be fulfilled by your Wi-Fi router.
9. Enable Location Services
Apple recommends confirming Location Services is enabled for Wi-Fi networking because the feature helps devices reliably connect, including in different regions where different Wi-Fi channels and signal strengths are standard. Location Services also assists features, such as AirPlay, that use Wi-Fi for part of their operation to perform well.
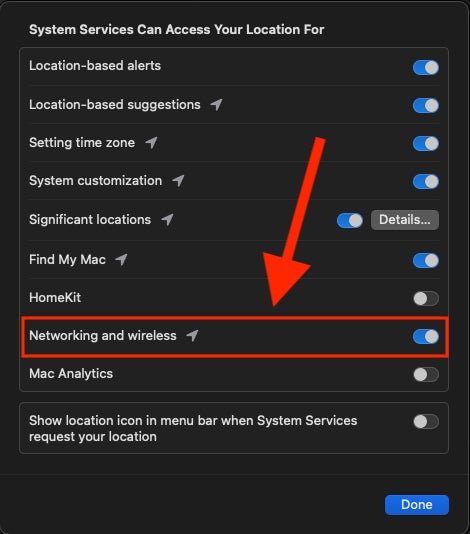
While the process varies on different devices, on macOS Ventura, you can confirm the setting by opening System Settings, clicking Privacy & Security, clicking Location Services, clicking the System Services Details button and ensuring the Networking and Wireless radio button is set to on, as shown in Figure A.
Figure A

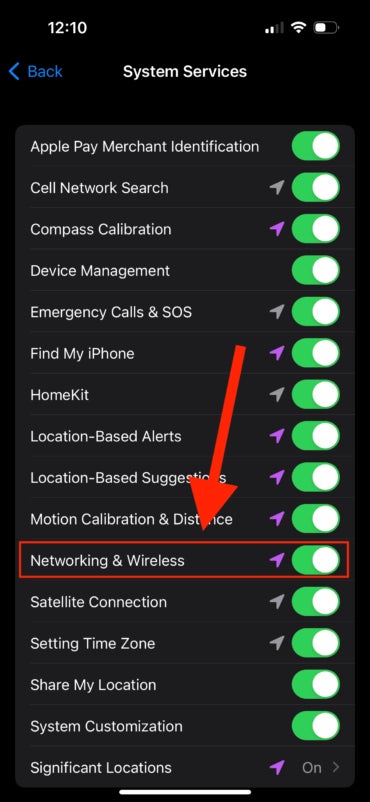
When using an iPhone and iOS 16, you can confirm Location Services are enabled for wireless networking by opening Settings, tapping Privacy & Security, pressing Location Services, scrolling to the bottom and tapping System Services and ensuring Networking & Wireless is set to on, as shown in Figure B.
Figure B

10. Set Wi-Fi Multimedia to Enabled
Wi-Fi multimedia assists prioritizing network communications. The technology helps maintain video and voice quality, for example, by prioritizing those communications on a wireless network. Any Wi-Fi router supporting Wi-Fi 4 and later should permit enabling the feature, which Apple notes should be used to enhance wireless performance and reliability.
But wait, there’s more
Wi-Fi connections are actually incredibly complex communications that, for the most part, we’ve come to take for granted. The technology is ever evolving and, thankfully, improving. As a result, expect new standards and features to prove the rule, rather than the exception. As such, Apple maintains these recommendations which, though subject to change, aren’t exhaustive.
Other guidance the company provides just within its Recommended settings for Wi-Fi routers and access points article include enabling all radio mode settings and bands, configuring specific channel widths (20MHz for the 2.4GHz band and Auto for the 5GHz and 6GHz bands) and configuring DHCP lease times to eight hours, among others. You might wish to check the page a couple times a year, though, as recommendations could change as new standards and best practices arise.


