Google will now require all users to enable two-step verification to protect their accounts. This means you’ll be need to respond to a notification on your mobile phone anytime you try to log into a Gmail account or other Google service. How do you set up two-step verification for Google? The process isn’t difficult but does require a few steps to take and a few choices to make. Here’s how it works.
SEE: How to set up two-factor authentication for your favorite platforms and services (free PDF) (TechRepublic)
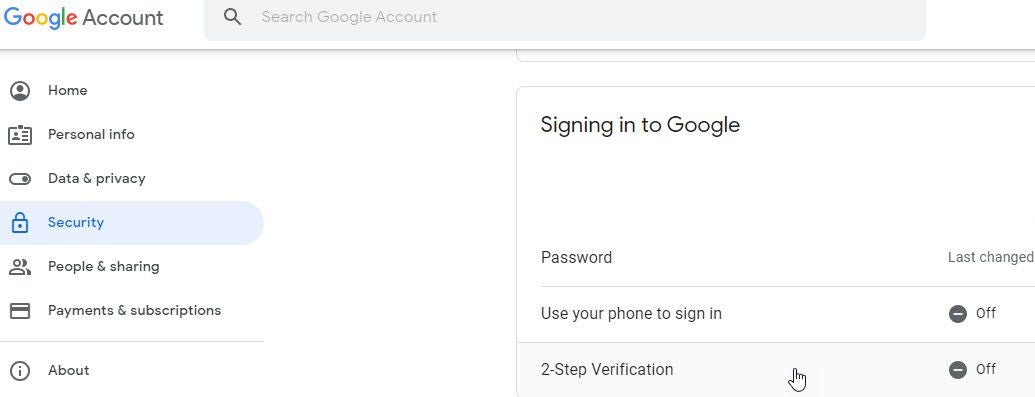
You can set this up on a PC or mobile device, but let’s try it on a PC for this example. First, sign into your Google Account page. Click the Security category on the left. In the Signing in to Google section, click the entry for 2-step verification if it’s currently turned off (Figure A).
Figure A

The next screen tells you that each time you sign in to your Google account, you’ll need your password and a verification code. Click Get Started. Then sign in again to your Google account. The next screen should show the name of your mobile phone as registered with Google. If not, click the link for “Don’t see your device?” and follow the steps to add your phone.
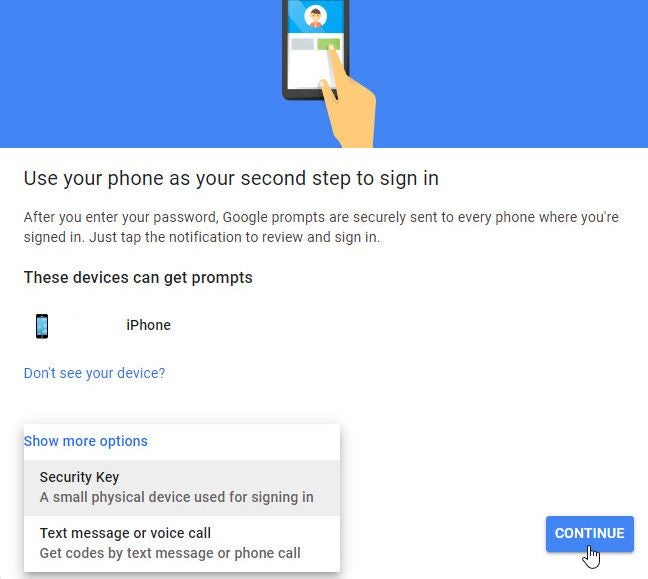
Here, you also have a couple of options on how to implement two-step verification. By default, the code will be sent to your phone via text or call. However, you can use a physical security key instead, which is considered more secure. Click the link for Show more options and choose your preferred method. Click Continue (Figure B).
Figure B

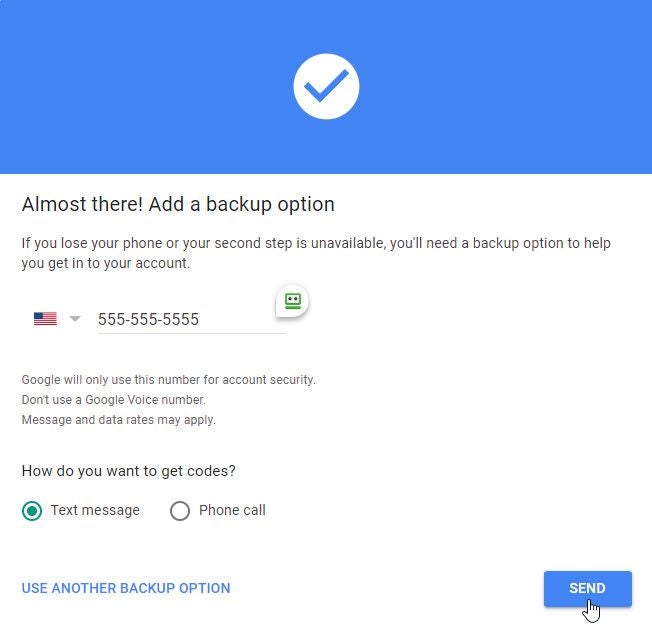
Assuming you chose the code option, the next screen displays your phone number and asks how you wish to receive the code: text message or phone call. Choose your preferred option and click Send (Figure C).
Figure C

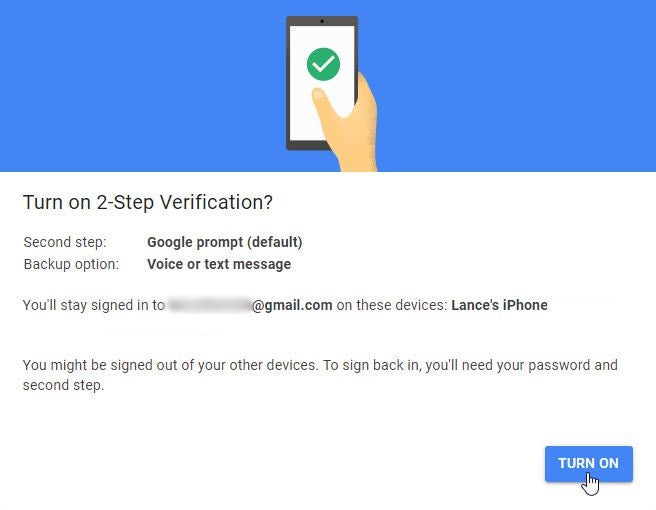
Check your phone for the sent code and type the number in the appropriate field on the next screen. Click Next. At the next screen asking you to turn on 2-step verification, click the Turn On button (Figure D).
Figure D

Two-step verification is now enabled. Any time you sign into your account, you’ll be prompted to verify your identity with the method you established. On an Android phone, you’d receive the code through a notification. On an iPhone, you’ll need to install and check the iOS Google app and tap Yes in response to a message asking if you’re trying to sign in.
From here, you may want to choose another backup step so you can sign in if your primary method is unavailable. At your Google account website, you can choose from among three backup steps: 1) A one-time backup code to use if your phone isn’t accessible; 2) An authenticator app such as Google Authenticator; 3) A physical security key (Figure E).
Figure E

To use backup codes, click the Set Up link for that option. Google displays a set of codes to use as backup verification. You can print and download them and get a new set of codes (Figure F).
Figure F

To use an authenticator app, download and install the app of your choice, such as Google Authenticator, Microsoft Authenticator, Authy or LastPass Authenticator. Click the Set Up link for authenticator app. Choose your type of phone–Android or iPhone. Click Next. Open the authenticator app. Tap the icon to create a new login and select the option to Scan a QR code. Point your phone at the code displayed at your Google account page until it’s scanned. Click Next (Figure G).
Figure G

Enter the code displayed in the authenticator app and click Verify. Then click Done (Figure H).
Figure H

To use a security key, click the Set Up link for that option. You can then choose a Bluetooth security key, a USB security key or the security key built into your phone. Select your preferred option and make sure it’s available. If you choose a physical security key, plug it into your computer. If you choose a key built into your phone, an Android device will automatically be added to your account. For an iPhone, you’ll need to download and install the Google Smart Lock app for iOS (Figure I).
Figure I


